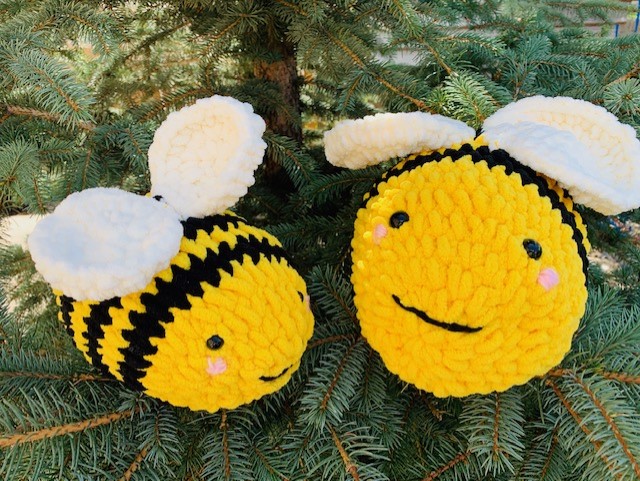
How to Crochet Large Amigurumi Bee
Have you seen those adroable crochet bees on the blogosphere? I am so in love with them! They are so cute and cuddly. The key is to make them with the soft blanket yarn. This way they are not only soft and squishy, they also work up super fast! These would make a great gift and you could esily have a whole pile of them done before the holidays!
Here is a free pattern for the large squishy bee!
Materials
For this bee, I used Bernat Blanket Yarn. This yarn is so soft and beautiful! This is not a necessity but just makes is softer. You could use other yarn or two strands of acrylic yarn if you wanted or had that on hand!
Bernat Blanket Yarn Vintage White
Small Scraps of Acrylic Yarn for the Facial Features
Pattern
(With Main Color)
Row 1: Magic circle. Place 8 sc in the magic circle. Join at the first stitch and chain 1.
Row 2: Place 2 sc in each sc around. At the end, you will have 16 sc. Join at the first stich and ch 1.
Row 3: Place 2 sc in the first stitch. Sc in the next stitch. Repeat this pattern around. At the end, you will have 24 stitches. Join to the first stitch.
Row 4: Place 2 sc in the first stitch. Sc in the next stitch. Sc in the next stitch. Repeat this pattern around. At the end, you will have 32 stitches. Join to the first stitch. Ch 1.
Row 4: Sc in each stitch around. Join to the first stitch. Ch 1.
Row 5: Sc in each stitch around. Join to the first stitch. Ch 1.
Row 6-7: Sc in each stitch around. Join on each row. Ch 1 on each row.
== Around this time, you can stuff your bee with fiberfill and put in the eyes if you are using safety eyes. Keep stuffing the bee as you go to get him nice and fluffy.====
(With Second Color)
Row 8-10: Sc in each stitch around. Join on each row. Ch 1 on each row.
(Switch to Main Color)
Row 11-13: Sc in each stitch around. Join on each row. Ch 1 on each row.
(Switch to Second Color)
Rows 14-16: Sc in each stitch around. Join on each row. Ch 1 on each row.
(Switch to Main Color)
Row 17- 19: Sc around. Join on each row. Ch 1 on each row.
Row 20: Sc first 2 stitches together. Sc in next 3 stitches. Do this around. At the end, you will have 24 stitches again. Join at the beginning and ch 1.
Row 21: Sc first 2 stitches together. Sc in next 2 stitches. Do this around. At the end, you will have 16 stitches again. Join at the beginning and ch 1.
Row 22: Sc first 2 stitches together. Sc in the next 2 stitches. Do this around. At the end, you will have 8 stitches. Join at the beginning and ch 1.
Row 23: Sc first 2 stitches together. Do this around. At the end, you will whip stitch the end together. Tuck in all the ends.
For the Wings (Make 2)
Row 1: Magic circle and put in the circle 8 sc. Join at the beginning and ch 1.
Row 2: Sc 2 sc in each stitch around. Join and ch 1.
Row 3: Sc 2 sc in the first sc, sc in the next sc. Repeat this pattern around. Join and ch 1.
Row 4: Sc 2 sc in the first sc, sc in the next sc, sc in the next sc. Repeat this pattern around. Join. Finish off.
After you make 2 of the wings, you will sew them to the top of the bee.
Sew on the smile and the cheeks with acrylic yarn. I used black for the smile and pink for the cheeks.
Tuck in all the ends and you will be finished!
I hope you enjoy your bee and maybe make a few! I would love to hear!
Happy Crochet!
-Elizabeth
If you want to see this bee on my other items on my Etsy Shop, click below!

Other Projects that you May Enjoy: