
How To Crochet a Basic Beanie Hat for Adults (Super Easy!) (With Video Tutorial)
Hello crafty friends. I hope that this August day finds you well. It is starting to change temperatures just a wee bit here in Colorado. Today it is a little windy and you can hear the leaves rustling outside the window. It is a symbol to me that fall is coming soon! And to me, fall time is crochet hat time! Crochet hats (as I have probably mentioned a time or two) are one of my favorite crochet projects. I love that you can make a hat in an hour or two. I like that they are pretty repetitive. I also love that you can have a finished, practical object at the end of your crochet session!
If you would like to watch the video tutorial for this pattern, please click below!
For this project, you will only need to know a few stitches. You will need to know the double crochet stitch, the chain, the single crochet and the slip stitch! If you know these stitches than you will do great. This is a great beginner project.
Materials
For this project you will need a few items:
Yarn: I used Red Heart Super Saver for my project Red Heart Yarn
Stitch Abbreviations
Sc- Single Crochet
Dc- Double Crochet
Ch- Chain
Pattern
Row 1: Magic Circle: Place 9 Dc in the magic circle. Join to the first stitch. Ch 2.

Row 2: Do 2 dc in each stitch around. Join at the beginning. Ch. 2.

Row 3: Do 2 dc in first stitch, 1 dc in the next stitch. Join to the beginning. Ch. 2.
Row 4: Do 2 dc in the first stitch, 1 dc in the next stitch, 1 dc in the next stitch. Join to the beginning. Ch. 2.
Row 5: Do 2 dc in the first stitch, 1 dc in the next stitch, 1 dc in the next stitch, 1 dc in the next stitch. Join to the beginning. Ch. 2.
Row 6: Do 2 dc in first stitch, 1 dc in the next stitch, 1 dc in the next stitch, 1 dc in the next stitch, 1 dc in the next stitch. Join to the beginning. Ch. 2.
Row 7- 13: Dc in each stitch around. If you would like to put a stripe in, change your color at row 10. Join and ch. 2 after each row.
For the gathered bottom of the hat: At the end of row 13, do not ch. 2. Turn your work sideways and ch. 5. Sc in the second ch from the hook and in the back loops only of the remaining chains. At the bottom of the hat, slip stitch in the next two stitches. Ch. 1. (Refer to the pictures..) Sc in the back loops only of the first 3 sc across. Sc in the last stitch into both loops. Ch. 1) and turn.

For the rest of the bottom of the hat: Sc in the first sc, sc in the back loops only of the next 3 stitches. At the bottom of the hat, slip stitch in the next two stitches. Ch. 1. Sc in the back loops only of the first 3 sc across. Sc in the last stitch into both loops. Ch. 1 and turn. Do this across the bottom of the hat and join to the begining. Sew the ends together and finish off.

So what do you think? Would you create this easy hat pattern? I would love to hear if you do!
Other Patterns You May Enjoy:
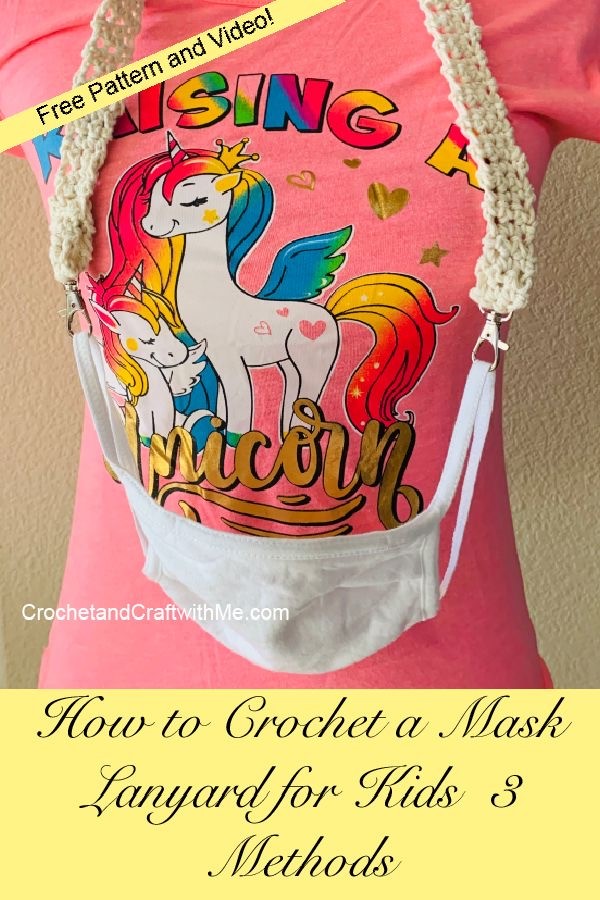
How to Crochet a Mask Lanyard for Kids (Several Methods) With Video Tutorial
How To Crochet a Half Double Crochet Hat and Scarf Set

How to Crochet A Velvet Scrunchie With Video Tutorial!

Please Check out My Etsy Shop and See what you Can Find!
Also, check out my crochet tutorials on You Tube!


